Wordless Wednesday – Favorite Christmas Cookies

CarolynCares Peanut Blossoms Cookies


Peanut Blossom Cookies

½ cup granulated sugar

½ cup firmly packed brown sugar

½ cup shortening

½ cup peanut butter

2 Tablespoons milk

1 teaspoon vanilla

1 egg

1 ¾ cups flour

1 teaspoon baking soda

½ teaspoon salt

Sugar for rolling

48 milk chocolate candy kisses

Heat oven to 375 degrees. In large bowl, combine sugar, brown sugar, shortening, peanut butter, milk, vanilla and egg. Mix until fluffy. Add flour, baking soda and salt. Blend at low speed until stiff dough forms. Shape into 1-inch balls; roll in sugar. Place 2 inches apart on ungreased cookie sheets.

Bake at 375 degrees for 10-12 minutes or until golden brown. Immediately top each cookie with a candy kiss, pressing down firmly so cookie cracks around edge; remove from cookie sheets. Cool completely.

Yield: 4 dozen cookies

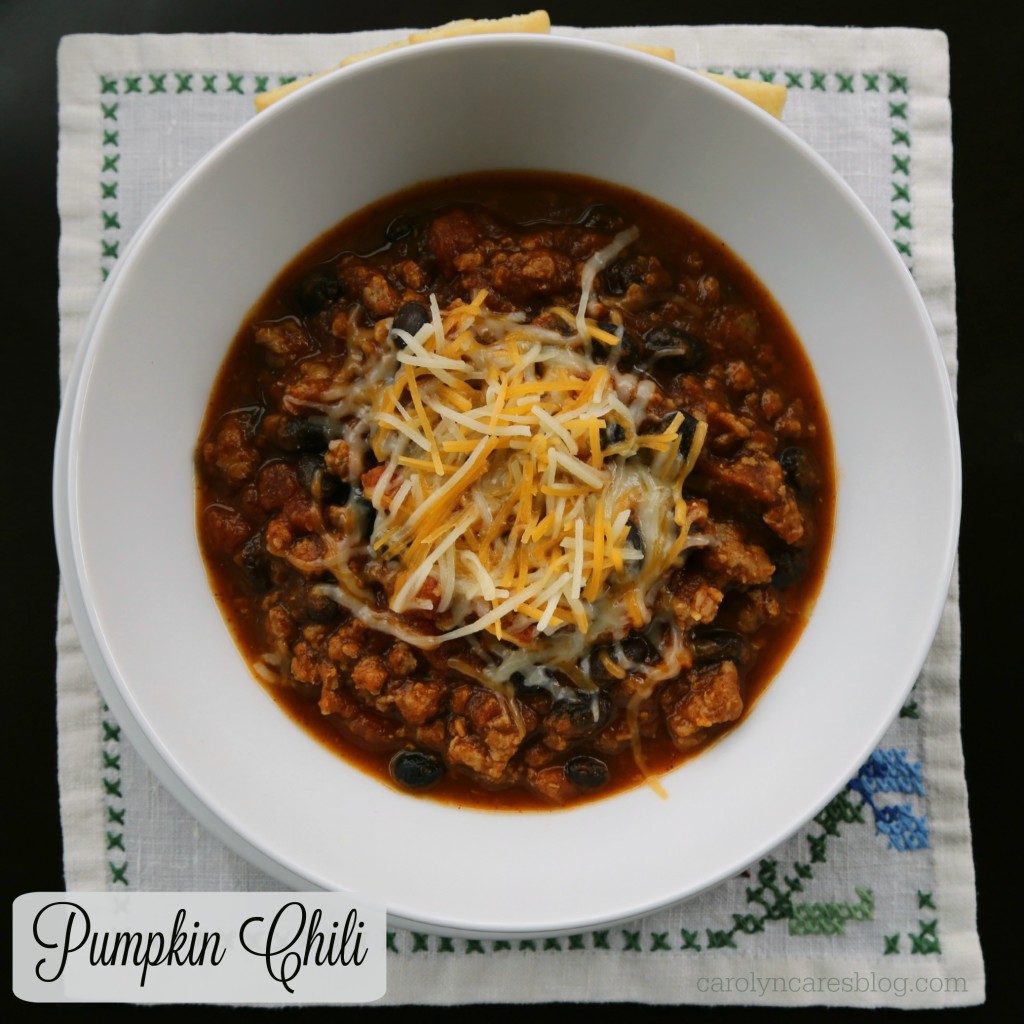
Meaty Monday – Pumpkin Chili

Need a fast, easy chili recipe? This pumpkin chili can be taken from the frozen meat, to the table in about 35 – 40 minutes.

I am horrible at making menus for the week. I tend to decide at the last minute what we should eat that meal. I know life would be easier if I could plan and shop ahead, but old habits are hard to break!

I love this recipe, because it is healthy, and fast. There is no shame in using canned or frozen ingredients! Keeping extra canned and frozen ingredients on hand works well when you live in areas where the winters make running to the grocery store impossible at times.

We are pig farmers, and have a lot of pork on hand, so I use ground pork for this recipe. Feel free to use whatever ground meat you have on hand. Since I am usually a last minute cook, I thaw my ground pork in the microwave. While I’m thawing the meat, I start to cook the onions in olive oil. My eyes run like a river when I cut onions, so I use Ore-Ida frozen chopped onions. I measure out the correct amount, and toss them in the pot frozen. No need to thaw before use! To make things easier, I measure out the spices and bouillon into a small ramekin or bowl while the onions are cooking.

After the onions are cooked down, add the ground meat, and brown it until it is cooked thoroughly. Add the diced tomatoes, pumpkin, black beans, and vegetable stock, stirring to combine. Sprinkle the chili powder, cumin, pepper and beef bouillon over the top, then stir in until the chili is mixed well. At this point, give the chili a taste and see if you need to add salt. I typically leave the salt out, and it is just fine.

Bring the chili to a simmer, and let it cook for 20 minutes. If you are thinking ahead, you can put this in a slow cooker on low for a few hours.  To serve, ladle the chili into bowls, and top with a bit of shredded cheese. If I have a mix on hand, I’ll whip up some honey cornbread to go with it.

Here’s the recipe:

1 Tablespoon olive oil

1 cup chopped onion

1 teaspoon minced garlic (I like to use garlic powder, adding it with the other spices)

1 pound ground pork

1 (14.5 ounce) can diced tomatoes

1 can pumpkin puree

1 ½ Tablespoon chili powder

1 teaspoon cumin

½ teaspoon pepper

1 Tablespoon granulated beef bouillon

Salt to taste

1 can black beans (rinsed and drained)

1 cup vegetable stock (can use more if you like your chili more soupy)

Heat oil in large skillet or Dutch oven over medium heat, and sauté the onion and garlic until tender.

Stir in the pork, and cook until evenly brown.

Mix in tomatoes, pumpkin and black beans.

Stir in beef bouillon and vegetable stock.

Season with chili powder, cumin, pepper, and salt.

Reduce heat to low, cover, and simmer for 20 minutes or put in slow cooker.

Serve with shredded cheddar cheese over top if desired.

Serves 6

Carolyn Cares Pumpkin Chili

Comfort Foods…A Culinary Warm Blanket

I’m sick. It doesn’t happen very often, and this cold is really making me feel cruddy. I am craving foods that give my insides a cuddle that only a warm, fuzzy blanket on a cold day can bring. Since my throat is pretty raw, and talking has become an issue, my first love has been tea.

When I was growing up, my mom would whip up a batch of Russian Tea mix in the fall. I loved coming inside from playing in the snow, and smelling the orange and spicy aroma of this tea. I still make a batch every fall, just to make sure I am prepared for the cold, snowy days of winter.

The ingredient list is pretty simple:

IMG_6385b

I have modified the recipe that is listed in our church cookbook, but that is the beauty of this recipe. You can tweak it to suit your taste.

Russian Tea Mix

2 cups Tang powdered orange drink (this works much better than orange Kool-aid)

1 1/2 cups sugar (I omit the sugar – this is sweet enough without it)

3/4 cup unsweetened lemon flavored instant tea

1/3 cup powdered lemonade (I use a couple packets of True Lemon instead)

1 teaspoon cinnamon

1/2 teaspoon ground cloves

Mix all ingredients…or, if you are like me, put all ingredients into a food processor and pulse until all particles are the same size. I prefer everything to be well mixed, and the same size so everything dissolves evenly. Store in an airtight container.  Add 2 tablespoons of tea mix to an 8 ounce mug of boiling water.

I store my tea mix in a plastic airtight container.

Lately, I’ve been adding a splash of cranberry juice to my tea. If it’s before bed, I may add a splash of Prairie Vodka as well. It is my form of NyQuil.


What are some of your favorite comfort foods that you crave when not feeling well? Share your recipes, if you’d like. I’d love to try them!


Going Old School – Boneless Pork Loin Supper

When I am having troubles with inspiration on what to make for supper, I’ll ask Jonathan to bring a random package of meat in from the freezer.  This time, he brought in a boneless pork loin roast. We put it in the fridge to thaw overnight, so I had a few hours to decide what I wanted to do with it.

The roast as it arrived in from the freezer.


Typically I like to use the Crock Pot, but since I wasn’t roasting any veggies with this one, I decided to use the oven.  I have a Corning French White baking dish that we received for a wedding gift 24 years ago. It is the perfect size for most roasts.

This Corning baking dish rocks!

Preheat your oven to 350 degrees. It is a good idea to spray the baking dish with non-stick spray.  Unwrapping the roast is a little like unwrapping a Christmas present. You know that you are going to love what’s inside, you just don’t know exactly what it looks like.  This one did not disappoint!

Beautiful boneless roast with an excellent fat cap

The layer of fat on top of this roast was beautiful! It wasn’t too thick, yet it covered nearly the whole top.  When you are shopping for roasts, look for one with a layer of fat like this one. It helps keep the meat moist while it is roasting, yet isn’t so thick that your seasonings can’t flavor the meat.

Speaking of seasonings, I decided to go old school with a twist. I don’t know what is tradition in your area, but around this Scandinavian area, we don’t get too wild with the spice.

Hy-Vee dry onion soup mix, Vegetable Stock, and Red Wine - simple seasonings
Hy-Vee dry onion soup mix, Vegetable Stock, and Red Wine – simple seasonings

I love the Hy-Vee brand of dry onion soup mix. It is inexpensive, and has a great flavor. Emeril’s Vegetable Stock has a good flavor, and isn’t too salty.  The red wine may break some rules, but I really have no clue what wine is supposed to go with what meat. I just use what I like…as you should!  If you don’t like wine, use apple juice.

Wine and Vegetable Stock poured over roast

Pour the liquids over the roast to get the surface moist. I used just under a cup of liquid total.  After the liquid is in, sprinkle the dry onion soup mix over the top. It should look like this:

Dry onion soup mix sprinkled over the top

Cover the whole thing with aluminum foil, and place on the middle rack of the oven.

The middle rack is the best to make sure heat circulates evenly

This roast was still slightly frozen when I put it in, so I set the timer for 2 hours.  I took it out about 5 minutes before the timer went off, and let it rest while still covered. If you are using a meat thermometer that you leave in while it is cooking, set your timer for 145 degrees.  This is what it looked like after the rest period:

Fresh from the oven. It smelled so good!

I’m always a little nervous when I make the first cut into a roast. I don’t want to mess it up with a bad slicing job! I should mention – it is okay for the center to have a bit of pink in it if the meat reached 145 degrees. The first few slices revealed a slight pink, and lots of juice!

This roast was tender and juicy.

I sliced the roast into 3 ounce portions, or one slice per serving. If you are weight conscious – as I am – one serving of lean pork roast is an excellent source of protein.

Each slice is about 3 ounces, or one serving.

I went traditional with our sides. We love Bird’s Eye Baby Sweet Peas, mashed potatoes, and homemade gravy. One final photo before Jonathan and I devoured our supper. The meat was moist, and tender…sooo good!

Supper is served!
Supper is served!

I hope you are able to try a similar recipe soon!

Love this Crazy Life

Time flies when you are having fun, right? I can’t believe how fast the last month has gone!

Jonathan and Laura returned from Tanzania full of stories, videos, and photos.  I’ll let Jonathan tell you about his experiences in another blog.

After the travelers returned home, we jumped right into a full schedule. Laura wanted to head back to college right away to try and catch up on more assignments, so I took her back to USF just a day after they returned home. A day later, Jonathan and I had an organic farming seminar to attend a few hours from home, so he basically hit the ground running as well.

The following week was Thanksgiving. We were hosting this year, so I was able to plan the event how I wanted it. My rule this year – nobody brings anything, and everyone stays out of the kitchen until time for dishes. The exceptions were Christina, who made the dinner rolls, and Laura, who was my sous chef.  The day was awesome. It was the most stress-free Thanksgiving I have ever hosted!

Our menu was partly traditional, and partly not. As in, we didn’t have any cranberry anything, and no marshmallows made an appearance on sweet potatoes.

We started the meal with a Squash Soup appetizer. While our guests were eating their soup, Laura and I set the rest of the meal on the table.

IMAG1112

The rest of our menu looked like this:

Apple Cider Brined Turkey

Mashed potatoes

A Simple Gravy made with chicken stock (no drippings)

Roasted Sweet Potatoes

Green Bean Casserole

Dinner Rolls (recipe follows)

IMAG1113

For dessert, I made a pecan pie, double layer pumpkin pie, and chocoflan

IMAG1110

After our meal, everyone pitched in on dishes, and then we relaxed. We took our Olson family photo (minus one nephew who is currently studying in India) so Grandpa could send out his Christmas letter.  It was nice to celebrate with Anita and Charles, who will be heading back to Canada in a couple of days to celebrate Christmas with Charles’ family. They will be heading back to the mission field after the New Year.

I am so thankful for my family, my in-laws, the outlaws, my friends. The list could go on forever. I have been so blessed this past year! Thank you, my dear readers, for being a part of my life for the last two years. I look forward to sharing more stories about my family, my farm, and successful ventures in the kitchen.

Fly Off the Plate Dinner Rolls

1 egg

1 1/2 cups warm water

4 1/2 cups flour

1/4 cup plus 1 Tablespoon sugar

1 teaspoon salt

3 Tablespoons instant dry milk

3 Tablespoons oil

2 1/4 teaspoons yeast

Mix egg with fork. Add ingredients in order recommended by your bread machine manufacturer. Put pan in bread machine. Select dough cycle, push start. After about 10 minutes, push finger into dough. If it is sticky, add more flour. When bread machine is done, shape into buns. Allow to rise about 20 minutes. Heat oven to 375 degrees F. Bake 10-15 minutes


An Answer to my Rhetorical Question?

I asked in my last post if I would ever catch up things, especially in the house. The answer came in an e-mail not long after I posed that question.

We will be hosting a few people from the advertising agency, mono. Tomorrow. Almost exactly 24 hours from now. They want to meet a farm family that raises some of the organic corn that goes into the Prairie Grains Organic Vodka. They are rolling out a new ad campaign, I guess.

This is the time where I would love if my house had a self cleaning setting, like my oven does. Just a flick of a switch and all the dust and grime would simply vanish. Sigh. I can dream, right?

Confession. I hate cleaning. A lot. Don’t get me wrong. I love it when the house is spotless. I just don’t love getting it there. To me it is about as appealing as a trip to the dentist.

In the past, I have bought books on how to clean your house with little effort that turns it into a joy. I am pretty sure the ladies who write these books are not vacuuming up corn, soybeans, wheat, field peas, or the copious amounts of soil that get transported in on work boots. I am guessing they haven’t dealt with hydraulic oil or engine grease on door handles or light switch plates and the walls that surround them.  Then there are the various items that come into the house in the pockets of jackets and jeans. Nails, screws, cotter pins, hitch pin clips,  papers from the bulk fuel guy or elevator weigh slips. I now use a little shop vac to clean the tile floors.  That is my cleaning tip of the week!

The time spent doing the mundane does give me time to plan out what to serve for the “little lunch” that we like to have for our guests. Jonathan and Laura wouldn’t mind Lemon Bundt Cake, but I’m looking for something a little different. Pumpkin Scones maybe?

The good thing about entertaining the folks from mono, is that I will be able to enjoy my clean house. Until harvest starts at the end of the week.

This is my favorite Pumpkin Scone recipe. I actually make them about 1/2 size to make it friendlier to those like me who are watching calories.

TOP SECRET RECIPES® VERSION OF
Starbucks® Pumpkin Scones
By Todd Wilbur

INGREDIENTS:
2 cups all-purpose flour
7 tablespoons granulated sugar
1 tablespoon baking powder
1/2 teaspoon salt
1/2 teaspoon ground cinnamon
1/2 teaspoon ground nutmeg
1/4 teaspoon ground cloves
1/4 teaspoon ground ginger
1/2 cup canned pumpkin
3 tablespoons half-and-half
1 large egg
6 tablespoons cold butter

Plain Glaze
1 cup plus 1 tablespoons powdered sugar
2 tablespoons whole milk

Spiced Icing
1 cup plus 3 tablespoons powdered sugar
2 tablespoons whole milk
1/4 teaspoon ground cinnamon
1/8 teaspoon ground nutmeg
pinch ground ginger
pinch ground cloves

INSTRUCTIONS
1. Preheat oven to 425 degrees F.
2. Combine flour, sugar, baking powder, salt, 1/2 teaspoon cinnamon, 1/2 teaspoon nutmeg, 1/4 teaspoon cloves, and 1/4 teaspoon ginger in a large bowl.
3. In a separate medium bowl, whisk together pumpkin, half-and-half, and eggs.
4. Cut butter into cubes then add it to the dry ingredients. Use a pastry knife or a fork to combine butter with dry ingredients. Continue mixing until no chunks of butter are visible. You can also use a food processor: Pulse butter into dry ingredients until it is the texture of cornmeal or coarse sand.
5. Fold wet ingredients into dry ingredients, then form the dough into a ball. Pat out dough onto a lightly floured surface and form it into a 1 -inch thick rectangle that is about 9 inches long and 3 inches wide. Use a large knife or a pizza wheel to slice the dough twice through the width, making three equal portions. Cut those three slices diagonally so that you have 6 triangular slices of dough.
6. Bake for 14 to 16 minutes on a baking sheet that has been lightly oiled or lined with parchment paper. Scones should begin to turn light brown.
7. While scones cool, prepare plain glaze by combining ingredients in a medium bowl with an electric mixer on medium speed. Mx until smooth.
8 When scones are cool, use a brush to paint a coating of the glaze over the top of each scone.
9. As that white glaze firms up, prepare spiced icing by combining ingredients in another medium bowl with an electric mixer on medium speed. Drizzle this thicker icing over each scone and allow the icing to dry before serving (at least 1 hour). A squirt bottle works great for this, or you can drizzle with a whisk.Makes 6 scones.

Soup is Good Food…

Our church started something new this year before our Wednesday Lenten Services; Lenten Soup Suppers.  Families can sign up to make and serve soup either on their own, or with another family.   Jonathan asked if we should make soup for one of the days, so we signed up along with the Laleman family.  I tested a few ideas out on the family before deciding on Cheddar Corn Chowder.

Tuesday night, before heading to bed, I put 6 loaves of Rhodes Frozen Bread Dough into aluminum bread pans.  I bought the disposable bread pans, since I only have two “real” ones…and I needed to make 6 loaves.  This would turn out to be a bad idea, if you like your bread to look like the perfect loaf.

Wednesday morning, I baked the bread 3 loaves at a time. After turning the bread out of the pans and brushing butter over the top, the bottoms started to crush in a little under the weight of the top of the loaf.  Obviously, the aluminum bread pans were made too narrow to support a baked loaf.  I decided to make one more loaf, but this time I used a Bob’s Red Mill Potato Bread mix.  I typically make this in my bread machine, but I used the directions on the mix to bake it in the oven.  I also used my “real” loaf pan, and it turned out beautiful.  Lesson learned.

After I was done with the bread, I chopped up 2 1/2 pounds of bacon, and cooked it up until it was crisp.  I removed the bacon from the pot, and added 3 bags of frozen, chopped onions.  If I were to cut the onions myself, I would probably still be crying!   The onions were cooked on medium heat until they were translucent, and some were starting to brown.  Both the bacon and the onions were left to cool, then put into containers to transport to church.

Next, I needed to peel and dice 8 pounds of potatoes.   Uff da!  At least the Twins were playing, and I could listen to John Gordon call the game while I diced.  I put them into a large Tupperware bowl in a little water so they wouldn’t turn brown.  Presentation, you know!

I measured out the flour, salt, pepper and turmeric, mixing them in a bag to make the next step easier.  The prep work was finished…or so I thought.  Right before it was time to head into church, I realized that I had forgotten to grate the white cheddar cheese.  Fortunately, Jonathan jumped in to help me with that job!

It was also our turn to serve bars and coffee after the service, so I needed to bake a couple pans of the girl’s favorite bars.  Viktoria requested Turtle Brownies, and Laura requested Chocolate Oat Bars (also called Chocolate Revel Bars).  The Turtle Brownies take longer to make, so they were first.  I do cheat a little on this one when I am in a hurry, and use a boxed brownie mix.  While the brownies were baking, I melted the caramels and cream before mixing in the pecans.  The caramel mixture gets dumped onto the brownies when they are hot out of the oven.  Then you let the brownies cool.  While they were cooling, I made the Chocolate Oat Bars.  My favorite recipe for this bar is from the “Joy of Cooking” 75th Anniversary book.   When the Turtle Brownies were cool, I made the chocolate glaze to go over the caramel part, then chilled the brownies before bringing them along.

We arrived at church around 4:45, about 1/2 hour later than what we had wanted. The Laleman’s already had their Chicken Noodle soup on one stove.  While I finished my soup recipe on the other stove, Jonathan and the kids from both families helped cut and butter all of the bread, and set all of the serving pieces out.  They finished setting up the serving line just as the soups were finished, and the first guests arrived.

This was also the last night for Butter Braid sales, so I baked up one last sample braid while Jonathan served the chowder.  After supper was finished, I had to run upstairs to play my violin during  the Holden Evening Prayer (which we use as part of our worship during Lent) while the other cleaned up the kitchen.  The families who were scheduled to serve bars and coffee helped set up the trays of goodies, and served everyone as they walked out of the sanctuary.  More food, and more fellowship!

I am tired, but it is a very good tired.  There is something so satisfying about the making, serving, and eating of food in the company of friends.  Soup is good food…both for the body and the spirit!

Cheddar Corn Chowder

      8 ounces bacon
      1/4 cup olive oil (can use a little less)
      6 cups chopped yellow onion (4 large)
      4 Tablespoons butter
      1/2 cup flour
      2 teaspoons Kosher salt
      1 teaspoon freshly ground black pepper
      1/2 teaspoon ground turmeric or curry powder
      12 cups chicken stock
      6 cups medium-diced white boiling potatoes, unpeeled
      10 cups corn kernals
      2 cups half-and-half
    1/2 pound sharp white cheddar, grated

Directions

In a large stockpot over medium-high heat, cook the bacon and olive oil until the bacon is crisp, about 5 minutes. Remove the bacon with a slotted spoon and reserve. Reduce the heat to medium, add the onions and butter to the fat, and cook for 10 minutes, until the onions are translucent.

Stir in the flour, salt, pepper, and turmeric and cook for 3 minutes. Add the chicken stock and potatoes, bring to a boil, and simmer uncovered for 15 minutes, until the potatoes are tender. Add the corn to the soup, then add the bacon, half-and-half and cheddar. Cook for 5 more minutes, until the cheese is melted. Season, to taste, with salt and pepper.